Designing basement home theater floor plans is where most people either set themselves up for years of enjoyment or lock in frustrations that are expensive to fix later.
I’ve walked into too many finished basements where the screen is slightly off-center, the seating is too close for the room size, or the subwoofer is stuck in a corner, creating a dead zone right where people sit.
At the planning stage, you have the biggest advantage you’ll ever have. You can place walls, run wires, control light, and shape the room before anything becomes permanent. This is where smart layout decisions matter far more than expensive gear.
This guide walks through practical basement home theater floor plans based on real room sizes, including seating layout, screen placement, speaker positioning, and the tradeoffs you need to understand before building.
Why Basement Layout Planning Is More Important Than Equipment
The biggest misconception I see is people prioritizing gear selection before locking down the layout. In reality, the room impacts up to 70% of your experience.
I’ve upgraded projectors, swapped receivers, and changed speakers countless times. Those are easy fixes. Moving a wall, relocating electrical, or correcting a bad seating distance after drywall is installed is a completely different story.
A well-planned basement layout solves:
- Viewing angle and immersion
- Speaker positioning accuracy
- Bass response consistency
- Cable routing and equipment access
- Light control and reflections
Once these are dialed in, even mid-range equipment performs far above expectations.
Check out our recent article on how much a home theater costs to set up.
Key Ideas For Planning A Great Basement Home Theater
Before jumping into specific layouts, here are a few rules I always follow when designing basement theaters:
Rule #1: Prioritize Symmetry First
Your screen wall should be centered. Your seating should align with the center. Your front speakers should mirror each other.
I once worked in a basement where a support column forced the screen slightly off-center. We tried compensating with speaker placement and calibration, but the imaging never felt right.
Eventually, we rebuilt a partial wall to restore symmetry. That fix made a bigger difference than upgrading any speaker in the room.
Rule #2: Control Your Viewing Distance
Your seating distance should match your screen size. Too close creates eye fatigue. Too far kills immersion.
A practical range:
- 4K projection: 1.0 to 1.5 times screen width
- 1080p projection: 1.5 to 2.0 times screen width
If you’re planning a 120-inch screen, your main seating row should typically sit around 10 to 13 feet back.
Rule #3: Leave Space Behind Seating
This is one of the most overlooked mistakes.
When seating is pushed directly against the back wall, the bass becomes uneven, and dialogue clarity suffers due to reflections.
Even 2 to 3 feet of space behind the main row makes a noticeable difference.
Rule #4: Plan Speaker Locations Before Construction
Do not guess this later. Run speaker wire, conduit, and back boxes during framing.
Retrofitting in-ceiling speakers or running wires through finished drywall is frustrating and often leads to compromised placement.
Basement Home Theater Floor Plans by Room Size
Let’s break down practical layouts based on common basement dimensions. These are real-world configurations I’ve used or adjusted in actual builds.
Small Basement Theater Floor Plan (10 x 12 to 12 x 14 feet)
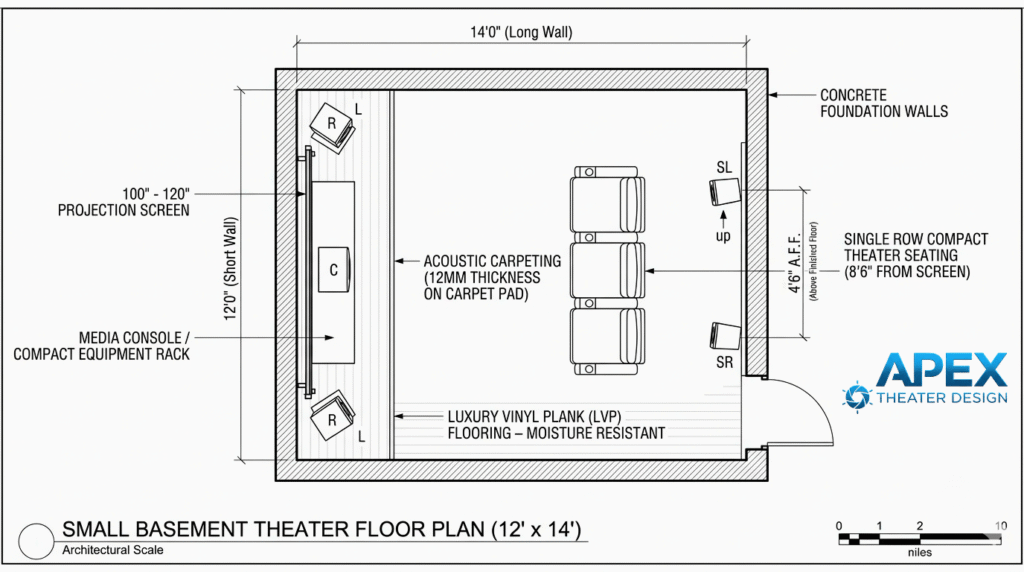
This is the most common size and the easiest to get wrong.
Recommended Layout:
- Screen on the short wall
- Single row of seating
- 5.1 speaker setup
- Wall-mounted or small tower speakers
- Compact equipment rack or media console
Seating and Screen Placement:
Your basement theater seating will likely sit between 8 and 10 feet from the screen. This works well for a 100 to 120-inch display.
Avoid oversized recliners in tight rooms. I’ve seen people install bulky seating that forced them too close to the screen.
Slim theater chairs or even a compact couch often work better here.
Speaker Placement:
- Front left and right at ear level, slightly angled toward seating
- Center directly under or behind the screen
- Surround speakers slightly behind and above the seating
Avoid putting surrounds directly to the side if your seating is against the wall. That creates a harsh, localized effect instead of an immersive field.
Common Mistakes in Small Rooms:
Pushing everything to the wall is the biggest issue. People think they’re gaining space, but they’re simply hurting sound quality.
Another mistake is trying to force a 7.1 or Atmos setup into a space that can’t support proper spacing. A clean 5.1 setup placed correctly will outperform a cramped 7.1 every time.
Medium Basement Theater Floor Plan (12 x 16 to 14 x 20 feet)
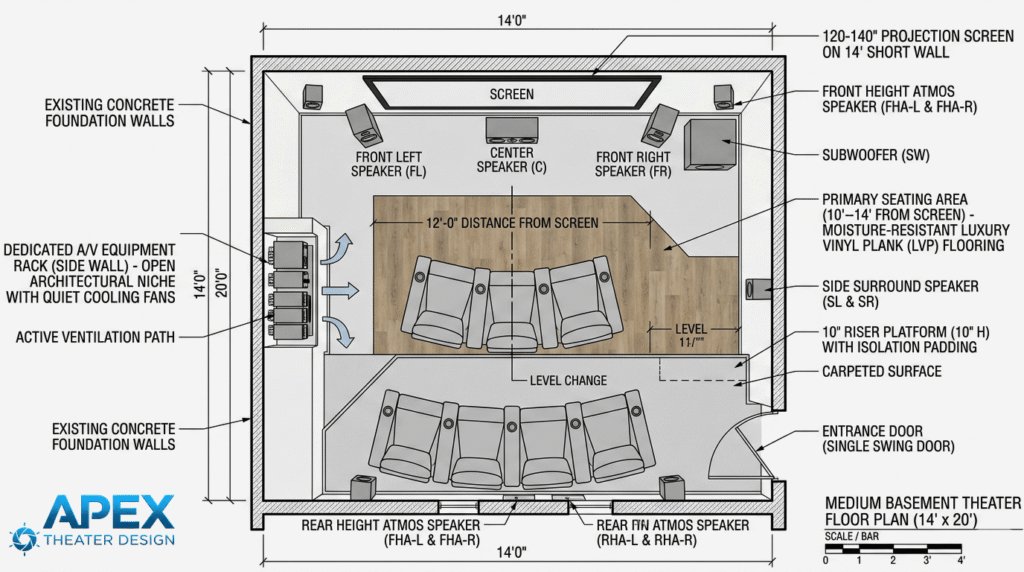
This is where you start getting flexibility and better performance potential.
Recommended Layout:
- Screen on the short wall
- One main row plus an optional second row
- 5.1.2 or 7.1 system
- Dedicated AV rack (closet or side wall)
Seating Layout:
Primary seating should sit around 10 to 14 feet from the screen. If you add a second row, you need elevation. A riser platform of 8 to 12 inches is usually enough.
I’ve built risers too low in the past, and the back row ended up staring at the heads in front. It’s worth getting this right.
Speaker Layout:
This room size supports:
- Side surrounds placed directly beside seating
- Rear surrounds for a 7.1 system
- Two in-ceiling speakers for Atmos
Spacing becomes critical here. Measure angles rather than eyeballing placement. Following official Dolby speaker placement guidelines helps ensure proper surround sound imaging and Atmos performance.
Equipment Placement:
Avoid placing your AV receiver in a sealed cabinet without ventilation. I’ve seen overheating issues cause random shutdowns mid-movie. Leave airflow space or install quiet cooling fans.
Real-World Adjustment:
In one medium room, we initially placed the subwoofer in the front corner. Bass sounded strong but uneven. Moving it along the side wall and recalibrating smoothed everything out dramatically. Sub placement often requires testing, even in a well-planned layout.
Large Basement Theater Floor Plan (15 x 22 feet and up)
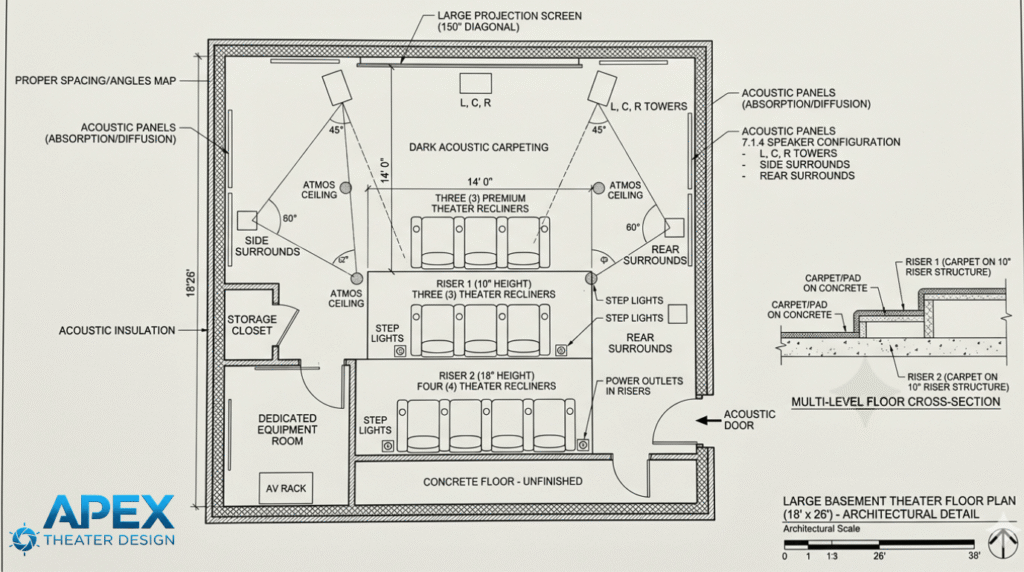
This is where you can build something close to a commercial cinema experience.
Recommended Layout:
- Large projection screen (120 to 150 inches or more)
- Two or three seating rows
- 7.1.4 or higher speaker configuration
- Dedicated equipment room or closet
Seating Strategy:
Main row should still be your priority. Position it at the ideal viewing distance, then build additional rows behind it.
Do not center the room around the back row. I’ve seen this mistake in large spaces where the best seat ended up being compromised.
Riser Design:
For multiple rows, proper riser height is essential.
- Second row: 10 to 12 inches
- Third row: 18 to 24 inches
Also consider step lighting and power outlets in risers for convenience.
Speaker Layout:
You can now properly space:
- Side surrounds
- Rear surrounds
- Four ceiling speakers for Atmos
Take time to map angles and distances. In large rooms, incorrect placement becomes more noticeable, not less.
Acoustic Considerations:
Large rooms often have more echo and reverb. Plan for acoustic panels on side walls and ceiling reflection points.
I’ve tuned large rooms where dialogue sounded distant until we added absorption panels. That change alone improved clarity more than upgrading the center channel speaker.
Open Concept Basement Layouts
Not every basement is a closed rectangle. Open layouts usually introduce challenges for your basement home theater design.
Key Issues Include:
- Sound leakage into other areas
- Reduced bass consistency
- Limited wall space for speakers
Consider This Practical Approach:
- Define a dedicated viewing zone with rugs and furniture placement
- Use directional speakers or towers instead of in-wall setups
- Consider dual subwoofers to balance bass across the space
I’ve had to reposition subs multiple times in open basements to eliminate dead spots. It’s normal to experiment here.
Screen Wall Design Considerations
Your screen wall anchors the entire layout.
Fixed Frame vs TV:
- Projector screens provide a cinematic experience in controlled lighting
- Large TVs work better in rooms with ambient light
Placement Tips:
- Center the screen horizontally
- Keep the bottom edge about 24 to 36 inches from the floor, depending on seating height
- Avoid placing the screen too high. Neck strain builds quickly during long viewing sessions
Wiring and Infrastructure Planning
This is where planning pays off long-term.
Run More Than You Think You Need
Install the following:
- Extra HDMI conduits
- Speaker wire for future upgrades
- Ethernet cables for streaming devices and AV gear
I’ve opened walls after the fact just to run one more cable. It’s avoidable.
Power Planning
- Dedicated circuits for AV equipment
- Surge protection
- Accessible outlets near seating for charging devices
Lighting Layout for Basement Movie Theaters
Lighting affects both mood and picture quality.
Recommended Setup:
- Recessed ceiling lights with dimmers
- Wall sconces for ambient lighting
- LED strip lighting for risers
Avoid placing lights directly above the screen. Even slight reflections reduce contrast.
Acoustic Planning You Should Not Skip
Even a basic acoustic plan makes a difference.
Key Areas to Treat:
- First reflection points on side walls
- Ceiling above seating
- Back wall behind seating
You don’t need to cover every surface. Strategic placement is enough to improve clarity and immersion.
Avoid These Common Basement Home Theater Floor Plan Mistakes:
These mistakes show up again and again, and knowing them in advance will help you avoid making them:
1. Seating Too Close to the Screen: This often happens when people overestimate how much space they need for walkways or furniture.
2. Ignoring Ceiling Height: Low ceilings limit projector placement and Atmos speaker angles. Measure early.
3. Poor Subwoofer Placement: Corner placement is not always best. Test multiple positions before settling.
No Equipment Access: If your receiver or media gear is hard to reach, troubleshooting becomes frustrating quickly.
Budget-Based Layout Priorities
Not every build needs to be high-end.
Entry-Level Budget
Focus on:
- Correct seating distance
- Proper speaker placement
- Light control
Skip complex speaker configurations.
Mid-Range Budget
Add:
- Atmos speakers
- Better seating layout
- Basic acoustic treatment
High-End Budget
Invest in:
- Dedicated room construction
- Acoustic design
- Multiple subwoofers
- Advanced calibration
Planning Before You Build or Renovate
This is your window to avoid costly mistakes.
What To Finalize Before Construction
- Screen wall location
- Seating positions
- Speaker layout
- Electrical and wiring plan
- Lighting zones
Sketch everything. Even a rough floor plan helps identify issues early.
I’ve seen projects delayed because seating blocked a door swing or a speaker conflicted with a soffit. These are easy fixes on paper, expensive fixes after framing.
Conclusion: Build the Room Around the Experience
Basement home theater floor plans are not about filling a room with equipment. They are about shaping the room around how you watch and listen.
Every decision should support the experience from the main seat. Not the back row, not the spec sheet, not what looks impressive in photos.
Get the layout right first. Then choose equipment that fits the space. That order matters more than most people realize.
A well-planned basement theater doesn’t need constant upgrades. It just works. And that’s what you’re aiming for.