Home Theater Room Layout (The Ultimate Guide 2026)
I’ve spent the last fifteen years crawling through fiberglass-filled crawlspaces, recalibrating projectors that drifted three months after installation, and moving 100-pound subwoofers two inches at a time to kill a bass null that was ruining a client’s favorite movie. If there is one thing I’ve learned from building dozens of theaters, it’s this: A $20,000 system in a poorly planned room will always get smoked by a $5,000 system in a well-planned one.
Most homeowners start their journey by browsing Best Buy for a shiny new OLED or a high-end Atmos receiver. That’s a grave mistake. Your room is the most important “component” in your signal chain. It is the vessel that holds the sound and the light. If you get the dimensions wrong, the seating is cramped, or the windows are in the wrong spot, no amount of digital room correction or “Golden Ear” cables can save you.
This home theater room layout guide is the blueprint I wish I had when I started. We’re going to cover everything from the “Golden Ratio” of dimensions to the psychological impact of lighting. Let’s get your room planned properly so you don’t end up tearing out drywall six months from now.
PS: The diagrams you see here are the same blueprints I use to deliver world-class home theater layouts for my clients.
Table of Contents:
Choosing The Right Room For Your Home Theater
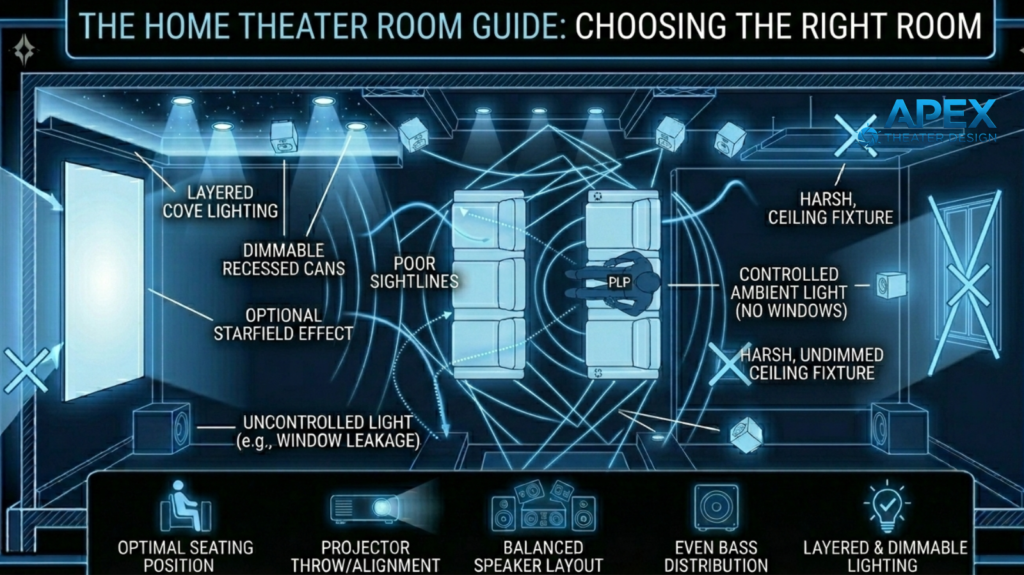
When clients ask me where to put their theater, they usually point to the spare bedroom or a dusty corner of the basement. Before you commit to a space, you need to evaluate four “silent killers” of performance that no salesperson will tell you about. Let’s briefly talk about each of them:
#1. Light Control (The Enemy of Contrast)
If you want to achieve that “inky black” cinematic feel, you should choose a room where you can achieve total darkness. Contrast is the most important factor in perceived image quality. And I can only think of one room that grants you this: the basement!
Basements are king when it comes to home theater setup and achieving total darkness. Why? The lack of windows makes them the natural choice. You may want to check my guide on how to turn your basement into a movie room.
NOW… you may not have a basement room to spare for a home theater. This means you’ll most likely go for a room with windows. And this creates the window problem.
If you are using a room with large windows, then you’ll have more problems to deal with apart from the light problem; you’ll be fighting heat and acoustic reflections. Remember, glass is a “sonic mirror.”
If you must use a room with windows, I advise you to factor in the cost of high-quality motorized blackout shades or heavy, 32-ounce velvet curtains immediately.
These help you eliminate ambient light that washes out black levels and destroys contrast. Moreover, the thick fabric reduces high-frequency reflections from glass, significantly improving dialogue clarity and tightening the soundstage.
#2. Foot Traffic and Noise Isolation
When building a theater, you shouldn’t only think about loud moments but also the quiet ones… Here’s what I always tell my clients: DON’T put a dedicated cinema right next to the guest bedroom or directly under a toddler’s playroom if you plan on watching Interstellar at reference volume at 11:00 PM.
- HVAC Considerations: Large air ducts often act like hollow pipes, carrying subwoofer bass to bedrooms or kitchen noise into your movie scenes. If your theater shares duct lines with the rest of the house, sound transfer is inevitable without intervention. To fix this, you should consider adding duct liners, using flexible sections to dampen vibrations, or isolating the theater with its own dedicated supply and return lines to keep the audio contained.
- Structural and Mechanical Noise: Noise from garages, laundry rooms, or busy hallways can easily vibrate through your theater, raising the noise floor and masking subtle dialogue or ambient effects. Noises like garage door openers, washing machines, and overhead footsteps often ruin the cinematic experience.
Before committing to a space, stand in the room at night to listen carefully; whatever background noise you hear in the silence is exactly what will bleed into the quietest scenes of your films.
#3. Seating Position Relative To Boundaries
Most people push their home theater recliner or couch against the back wall to “maximize space.” Acoustically, that is one of the worst places to sit.
Bass pressure builds up near boundaries. Sitting directly against the back wall exaggerates some frequencies and cancels others. Even high-end speakers will sound muddy or uneven from that position.
If your home theater room layout does not allow at least some distance between your primary seating and the back wall, you are starting with a built-in acoustic disadvantage.
#4. Room Shape and Dimensions
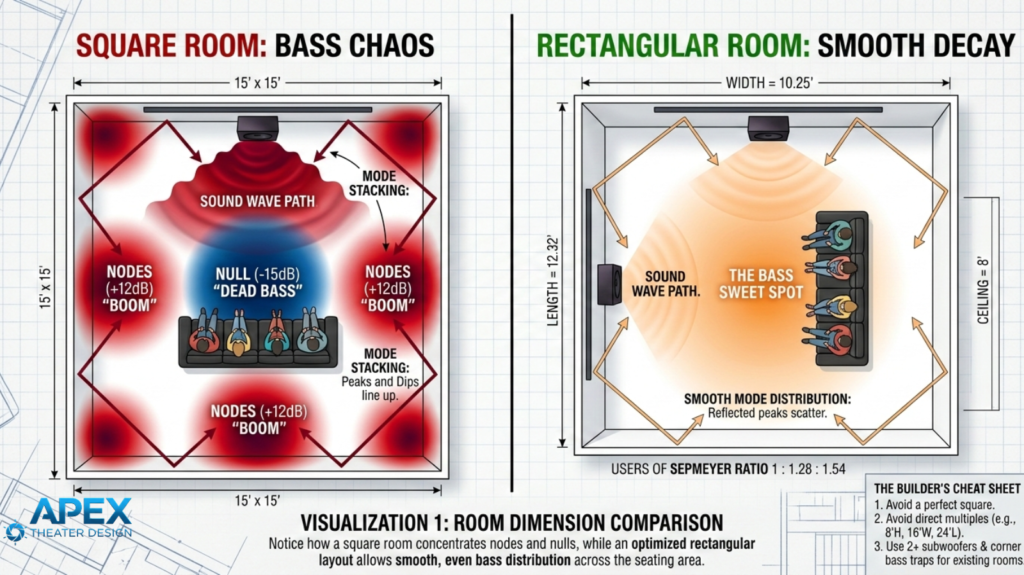
I always get this question from homeowners: What is a good size for a home theater room? And my first piece of advice is this: Avoid a perfectly square room at all costs.
I’ve tried to tune squares, and they have always turned out to be an acoustic nightmare. Square dimensions cause low-frequency standing waves to stack on top of each other.
The result is one seat with overwhelming bass and another where the subwoofer seems broken.
So, what’s the best home theater room shape? A rectangular room is your best friend because it allows the sound waves to decay more predictably.
In other words, rectangular rooms distribute bass modes more evenly and are dramatically easier to calibrate.
In the next section, we delve more into your home theater room layout dimensions…
What Are The Ideal Home Theater Room Dimensions?
Size matters when it comes to designing your home theater room, but volume and proportion matter more. You need enough air for the sound to travel and develop, but not so much that your amplifiers run out of “headroom” trying to fill the space.
How To Measure Your Space
To determine the size of a room you’ve set aside for a movie room, you simply measure your length (L), width (W), and height (H).
In home theater design, we pay close attention to room ratios, meaning the proportional relationship between height (H), width (W), and length (L).
One of the most well-known examples is the Sepmeyer Ratio (1.00: 1.28: 1.54). This means if your ceiling height is 9 feet, the ideal width would be about 11.5 feet, and the length about 13.9 feet.
These proportions help spread low-frequency resonances more evenly, so you don’t get massive bass peaks at a few specific notes.
Why Ratios Matter: If your room dimensions are multiples of each other (e.g., 8′ high, 16′ wide, 24′ long), the resonant frequencies will stack on top of each other. This creates massive “peaks” in volume at specific notes that make the room sound “boomy” or “honky.”
Ideally, you want your home theater room dimensions to fall within “The Bolt Area,” a mathematical graph that predicts a smooth distribution of room modes.
Recommended Home Theater Room Layout Dimensions By Tier:
The following are dimension ranges for real-world layouts I’ve built and calibrated, optimized for proper speaker spacing, seating distance, and balanced low-frequency behavior:
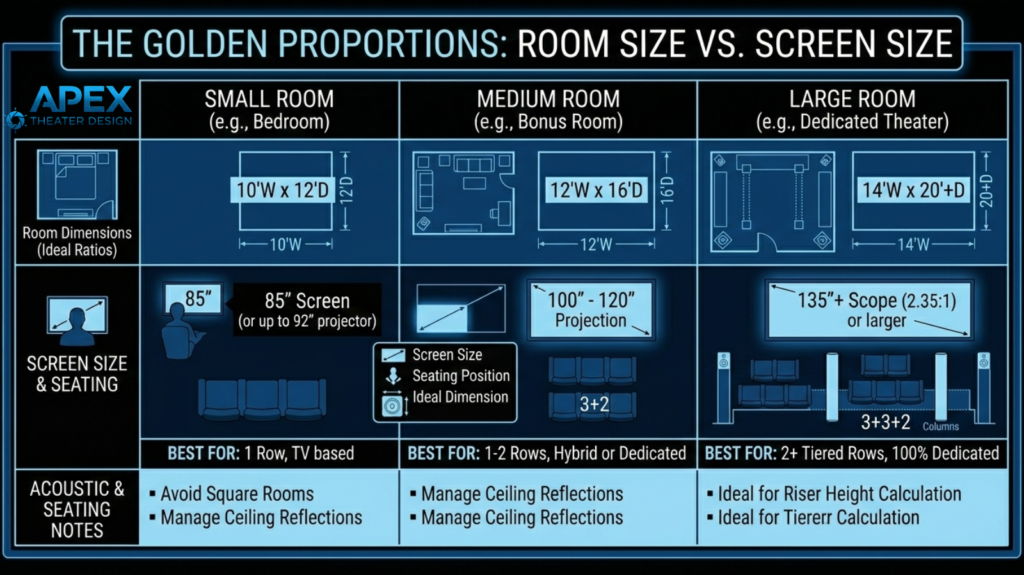
- Small Home Theater Dimensions (10’ x 12’ x 8’): This is more of a “media room” than a theater. It’s perfect for a 77″ or 83” OLED. You will struggle with a 7.1.4 Atmos setup here because the speakers will be too close to the listeners. Stick to a high-quality 5.1.2 setup.
- Medium Home Theater Dimensions (12’ x 18’ x 9’): This is the “Sweet Spot.” It allows for two rows of seating (one on a 12″ riser) and a 120″ to 135″ projector screen. You have enough width to place your side surrounds far enough away that they don’t “hotspot” (sound like they are screaming in your ear).
- Large Home Theater Dimensions (16’ x 24’ x 10’+): This home theater room layout for large spaces is the dream for many! This volume allows for true 9.2.6 or 11.4.6 Atmos configurations. You can use large, floor-standing speakers and multiple subwoofers (four is the pro standard) to achieve perfectly even bass across every seat.
Home Theater Seating Placement & Riser Heights
Home theater seating layout is one of the most overlooked aspects of home theater design, yet it has a huge impact on both comfort and sound quality. Where you sit changes how you hear bass, dialogue, and surround effects, so placement matters as much as your speakers.
This Is How You Position Your Seats Correctly:
A common mistake I see in 90% of DIY builds is pushing the seating right against the back wall. This creates “boundary bass buildup,” making low frequencies sound boomy and uneven.
You should aim to position your primary listening spot about one-third of the way into the room from the front wall. This keeps you out of the worst bass nulls and ensures a more even response across all seats.
If you have a multi-row setup, avoid placing the back row too close to the front row. Each row should have a clear view of the screen without craning your neck, and your ears shouldn’t be right in the middle of a low-frequency null.
The Ideal Riser Heights for Clear Sightlines:
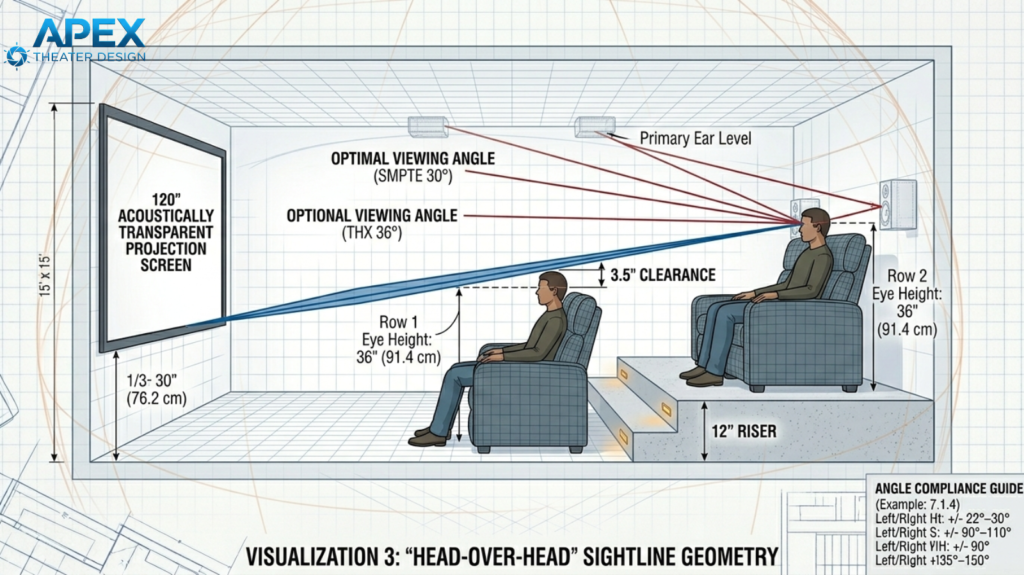
If you have two rows, the back row usually needs a riser so viewers can see over the heads of those in front. A standard riser height is about 12 inches, but the exact height depends on your chair height and ceiling.
- Rule of Thumb: Your eyes should line up with roughly the bottom third of the screen.
- Low Ceilings: If your ceiling is under 8 feet, you may need to skip a full riser and instead opt for a single row of primary seating with secondary seating behind a bar counter or elevated platform.
Proper seat placement and riser height go a long way in improving your comfort, visibility, and preserving the sound quality. Even small adjustments (like moving a seat a few inches forward or backward) can dramatically improve the listening experience.
Pro Tip: Avoid the Bass Null!
One trap beginners often fall into is centering seats along the exact length of the room. This is usually a “bass null” point where certain low frequencies cancel out. Experimenting with placement, sometimes just a foot forward or back, can make the bass feel fuller and tighter without changing any gear.
Screen Placement And Viewing Distance
This is one of the most debated topics in the home theater industry…
…but after years of fixing “neck-strain theaters,” I can tell you that the math matters less than the sensation. You want the screen to fill your peripheral vision without making your eyes hunt for the action.
Here is the breakdown of how to get the screen size and placement right the first time…
Finding Your Screen Size:
In the pro world, we talk about Field of View (FOV). If the screen is too small, you’re just watching a big TV; if it’s too big, you’re sitting in the front row of a stadium and will leave with a headache.
- The 40-Degree Rule: For a true 4K cinematic experience, you want the screen to occupy about 40 degrees of your field of vision.
- The Simple Math: A foolproof “pro” shortcut is to measure the distance from your eyes to the wall in inches and multiply by 0.83. That gives you the ideal diagonal screen size.
For example, if you sit 10 feet (120 inches) away, a 100-inch screen is your “sweet spot.”
- The Resolution Check: If you are watching 4K content, you can sit closer (or go bigger) because the pixels are so small that they are invisible to the eye. If you still watch a lot of 1080p Blu-rays or sports, don’t go too big, or you’ll start seeing the “fuzz” of the lower resolution.
Vertical Placement (The “Eye Level” Mandate)
This is the mistake that kills immersion. People tend to hang screens like they hang art—centered on the wall. Do not do this.
Instead, follow The Rule of Thirds: When you are seated comfortably, your eyes should level with a point one-third of the way up from the bottom of the screen.
Why? This is based on the simple fact that our eyes naturally prefer to look slightly down or straight ahead. If you have to tilt your head back even 5 or 10 degrees to see the top of the screen, you will experience neck fatigue within 45 minutes.
Pro TIP: Avoid The Fireplace Trap! Never, under any circumstances, place your home theater screen above a fireplace. It is ergonomically disastrous, and the heat is a slow killer for electronics.
TV vs. Projector: Which One Should You Get for Your Movie Room?
This is where I get honest with my clients. Ten years ago, projectors were the only way to get a “big” screen. But today, that has changed thanks to large-format TVs (we’re talking about 98-inch plus sizes).
Here is a quick breakdown of how a projector stacks up against the modern large-format TVs in a real-world home environment:
Feature | Projector & Screen | Large Format TV (98″+) |
| Light Control | Requires a “bat cave” (total darkness). | Works in rooms with windows and lamps. |
| Contrast | Black levels are limited by the room’s paint. | Inky, perfect blacks (especially OLED). |
| Installation | Complex (mounting, alignment, throw distance). | Simple (wall mount or stand). |
| The “Vibe” | Unmatched “cinema” feel; no glare. | Feels like a “Big TV”; can have reflections. |
| Audio | Can use an acoustically transparent screen to hide speakers behind the image. | Speakers must go above, below, or to the sides. |
The Pro Recommendation: If you have a dedicated room where you can paint the walls dark and turn off every light, go with a Projector. There is something “filmic” about light reflecting off a screen that a TV can’t mimic. However, if this is a living room where you’ll watch football with the shades open, buy a 98-inch or 115-inch Mini-LED TV. A washed-out projector image is the fastest way to regret your $5,000 investment.
A Note on “Acoustically Transparent” (AT) Screens
If you go the projector route, I highly recommend an AT screen. It’s a woven material that allows sound to pass through it.
This allows you to place your Center Channel speaker (the most important speaker for dialogue) directly behind the middle of the screen at ear level.
In a real cinema, the voices literally come out of the actor’s mouth. It’s the single biggest “PRO” secret for total immersion!
Home Theater Ceiling Height & Lighting Considerations
In most homes, the ceiling is just a big white slab overhead. But in a home theater, that white slab is an “image killer” and an “acoustic nightmare.”
If you don’t address the ceiling, you’re essentially leaving a massive mirror at the top of your room that bounces light and sound everywhere it shouldn’t go.
Paint The Ceiling Black (The Secret To Deep Black Levels)
If you take a high-end projector and point it at a screen in a room with a white ceiling, the light from the movie will hit the screen, bounce off the white ceiling, and reflect right back onto the screen. This “light pollution” turns your deep, cinematic blacks into a muddy gray. Ouch!
The Pro Fix: You don’t necessarily have to paint the entire room black, but you must treat the “First Reflection Zone.” Paint at least the first 4 to 6 feet of the ceiling (starting from the screen and moving toward your seats) a flat, non-reflective dark color like midnight blue, charcoal, or deep black.
The Ultimate Hack: If you really want that “disappearing” ceiling, use black acoustic foam or velvet panels. Velvet absorbs 99% of light, making the ceiling feel like it’s infinitely high, or simply not there, once the movie starts.
Atmospheric Height: The Atmos Factor
Your home cinema room ceiling also acts as the “stage” for your overhead sound. If you are installing Dolby Atmos (which you should!), then your ceiling height dictates where those speakers go as I’ve outlined below:
- Standard 8–10 foot ceilings: Ideal for in-ceiling speakers.
- High or Slanted ceilings: You’ll need speakers with “pivoting” tweeters so you can aim the sound down at your ears.
- Low ceilings (Under 7 feet): If you have a small home theater room size or simply have low ceilings, then you should be careful with high risers. If your head is too close to a ceiling speaker, you’ll “hotspot” the sound, meaning you’ll hear the speaker itself rather than a seamless overhead effect.
Lighting Layers: Setting the Mood
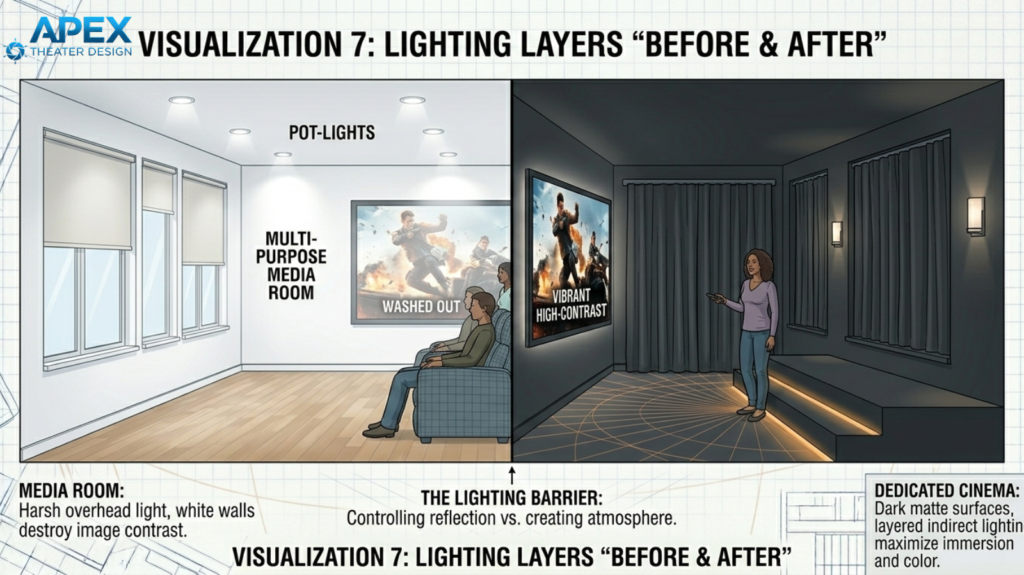
A single “on/off” switch is for kitchens, not cinemas. To get that “wow” factor when guests walk in, you need Lighting Scenes.
I recommend using a smart dimmer system (like the Lutron Caseta) to program these four specific modes:
- The “Grand Opening” (Walk-in): All lights at 100%. This is for cleaning, finding the remote, or safely navigating the room with a bowl of popcorn.
- The “Pre-Show” (Trailers): Overhead lights turn off, but wall sconces or perimeter LED strips stay at 20%. This mimics the “coming attractions” vibe and lets people settle in.
- The “Feature Film” (Blackout): Everything goes pitch black. The only light in the room should be coming from the screen itself.
- The “Intermission” (Quick Break): Low-level amber floor lighting or step lights kick on. This allows people to get up for a refill without getting blinded or tripping over your subwoofer.
Expert Tip: Hide Your Status Lights
Even if your lights are off, I recommend that you check your equipment. Blue LEDs on amplifiers or glowing status lights on a power strip can be incredibly distracting in a dark room. Use “LightDims“ (small blackout stickers) to cover every tiny LED on your gear. I know, this sounds obsessive, but once you experience a truly dark room, you’ll never go back.
Common Home Theater Layout Mistakes to Avoid
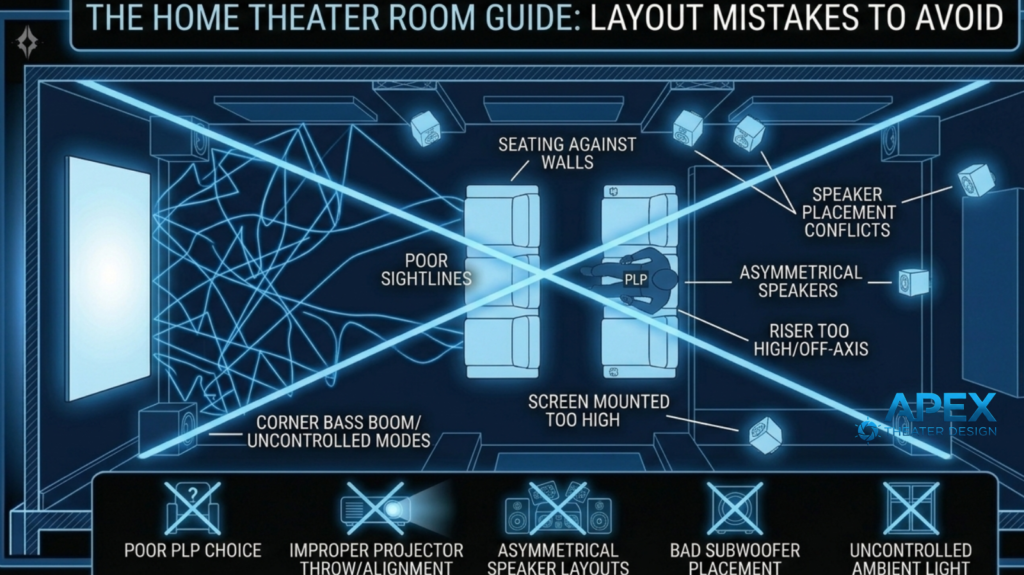
In my years of “rescue” missions, where I’m called in to fix a room that just doesn’t feel right, 90% of the issues stem from FOUR specific home theater room layout blunders. These mistakes usually happen because people apply “living room logic” to a “high-performance theater.”
Here is how to avoid the pitfalls that waste your good gear:
#1. The “Symmetry Trap”
Most people obsess over centering their screen and speakers on the wall. In a movie room, the wall doesn’t matter; the seat does.
The Mistake: If your room is 20 feet wide, but you’ve left a 4-foot walkway on the left side, your seating is now off-center. If you keep your speakers centered on the wall, the soundstage will feel skewed. One speaker will be 6 feet from your ear while the other is 10 feet away.
Pro Fix: Everything must be symmetrical to the Primary Listening Position (PLP). If you shift your couch to the left, your speakers and screen must shift left with it. Your ears shouldn’t have to work to find the center of the action.
#2. The “Subwoofer in the Corner” Myth
This is the most common “rookie” move I keep witnessing in many DIY home theater setups. Shoving a sub in a corner is called “corner loading.” It makes the bass louder (which sounds impressive for about five minutes), but it also makes it “one-note” and boomy.
The Mistake: Corner placement “excites” every room mode (those peaks and nulls we talked about earlier). You’ll get massive bass at certain frequencies and almost nothing at others. It’s the difference between a clean “thump” and a muddy “drone.”
Pro Fix: If you have one sub, use the “Subwoofer Crawl”. If you have two, place them at the mid-points of opposing walls (front and back, or left and right). This cancels out the room’s natural ringing and gives you smooth, consistent bass in every seat.
#3. The “Acoustic Foam” Fail
I see this on social media all the time: a room covered in thin, grey, “egg-carton” foam squares from Amazon.
The Mistake: That cheap foam only absorbs very high frequencies (the “tink-tink” sounds). But it does absolutely nothing for the low-mids and bass. By using it, you strip the “life” and clarity out of the room but leave all the muddy, boomy echoes behind. It makes the room feel claustrophobic and sounds terrible.
Pro Fix: Use High-Density Mineral Wool or Fiberglass panels (like Rockwool) that are at least 2–4 inches thick. These have the mass required to slow down a sound wave. You don’t need to cover every wall… just the “First Reflection Points” where the sound hits the wall on its way to your ears.
#4. The “Wall-Hugging” Seat Placement
I get it; you want to maximize your home theater room floor space. But get it from me: Pushing your seating row right against the back wall is committing an acoustic death sentence.
The Mistake: Bass builds up against the walls. If your head is 6 inches from the back wall, you are sitting in a “pressure zone.” The bass will sound bloated and overwhelming, masking the fine details in the movie’s dialogue and score.
Pro Fix: Move your seats at least 2 to 3 feet off the back wall. This allows the sound to “breathe” and gives you space to place your surround speakers behind or beside you, rather than having them fire directly into the side of your head.
Final Tip: Avoiding these layout traps doesn’t involve spending more money. It all comes down to respecting the physics of your room so your gear can do the job it was built for.
Best Home Theater Room Shape (Rectangular vs. Odd-Shaped):
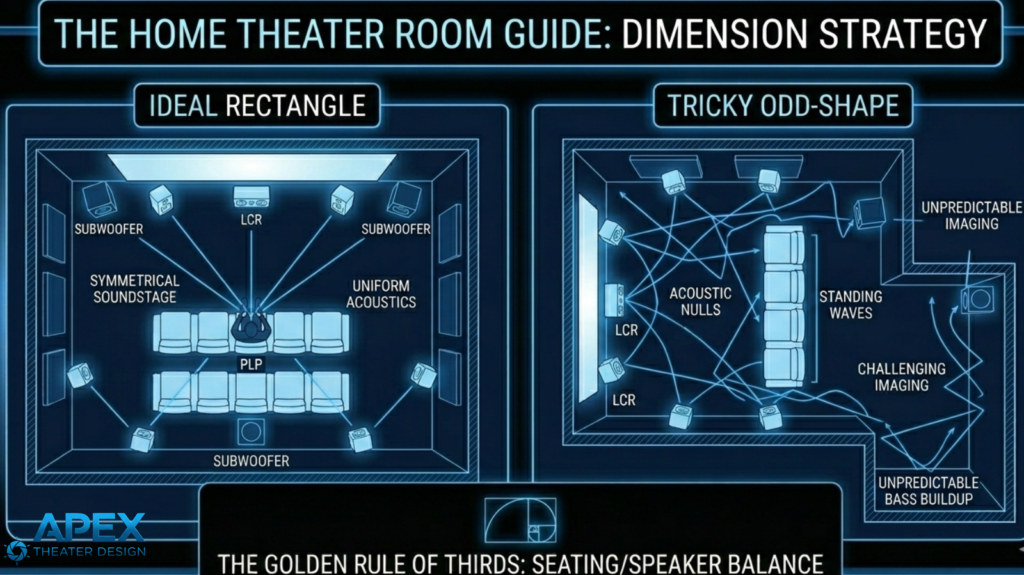
We said earlier that a rectangular shape is ideal for home theater rooms. But not everyone has a perfect shoebox room.
Most of us are fighting with L-shaped basements, open-concept living rooms, or bonus rooms with weird, slanted ceilings.
These odd rooms can still work, but you need a different approach.
Here’s what to do if you have an odd-shaped room:
Handling the “L-Shape” and Open Floor Plans
If one side of your theater is a solid wall and the other side opens up into a kitchen or hallway, you have an asymmetry problem. The walled side will reflect sound and build up bass pressure, while the open side lets the sound “leak” out. This makes the movie sound “lopsided.”
To fix the lack of “room gain” on the open side, I often place a more powerful subwoofer (or a second matching sub) on that open side. This helps pressurize the air that is otherwise escaping into the rest of the house.
The Power of DSP (digital signal processing): Once the subwoofers have filled the room with enough bass, you can then use the DSP for fine-tuning. This is where modern Room Correction software (like Dirac Live, Audyssey, or Anthem ARC) becomes your best friend. These systems measure the timing of each speaker and adjust the volume and phase so that, even if your room is lopsided, the sound hits your ears perfectly balanced.
Pro Tip: If you’re on a tight budget, start with the Subwoofer trick (better placement or a second sub). If you have the budget for a high-end receiver, Dirac Live is currently the best DSP for handling these tricky, asymmetrical rooms.
Slanted Ceilings: A Blessing and a Curse
If you plan to transform your garage or attic space into a movie room, this is your part. Rooms over garages or attic conversions often have “clipped” or slanted ceilings.
Acoustically, this is a secret weapon because parallel surfaces are what cause echoes. But slanted walls? They break them up naturally.
The major downside of slanted heights is that you can’t just slap standard speakers in the ceiling and expect them to fire down at you.
The Fix: Use in-ceiling speakers or angled baffle speakers. These allow you to “aim” the sound toward the seating area despite the angle of the drywall. If the slant is too aggressive, you can skip the in-ceiling speakers and use “On-Wall” height speakers mounted at the top of the side walls aimed downward.
Pro Tip: The “Thick Rug” Rule. If you have a weird home theater room shape, you’re going to have unpredictable reflections. The easiest, most spouse-friendly way to settle an odd room down is having a thick area rug with a high-quality felt pad underneath. It works wonders for “taming” the space before you even touch your receiver settings.
Acoustic Considerations For Your Home Theater Room
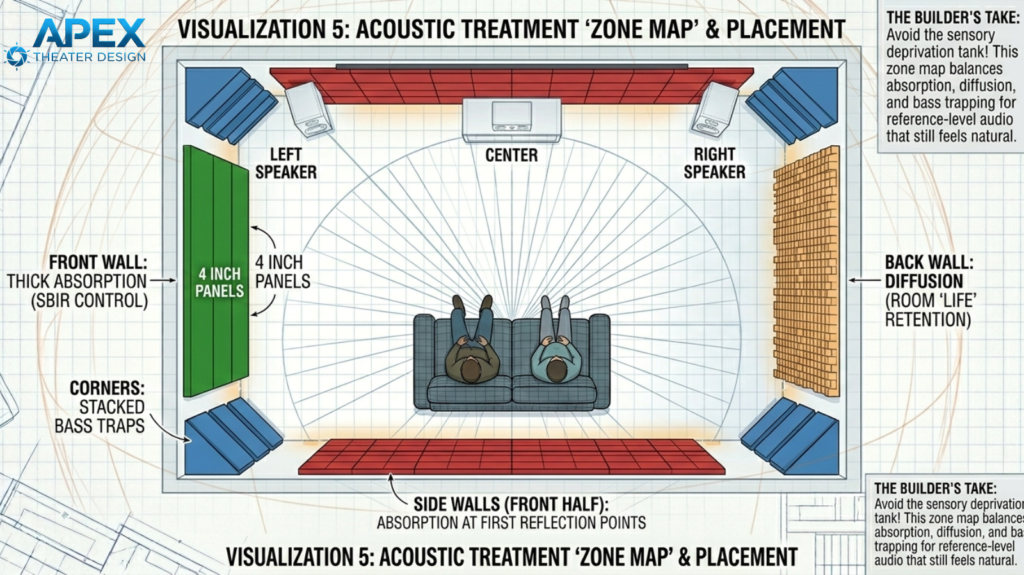
A home movie room without acoustic treatment is basically a giant echo chamber. When your speaker fires, you’ll be hearing the “direct” sound first, followed milliseconds later by the “reflected” sound bouncing off your walls.
This creates what we call auditory smearing; it makes dialogue harder to understand and ruins the pinpoint accuracy of your soundstage.
Here is how to stop the “bounce” and make a $500 speaker sound like a $2,000 one:
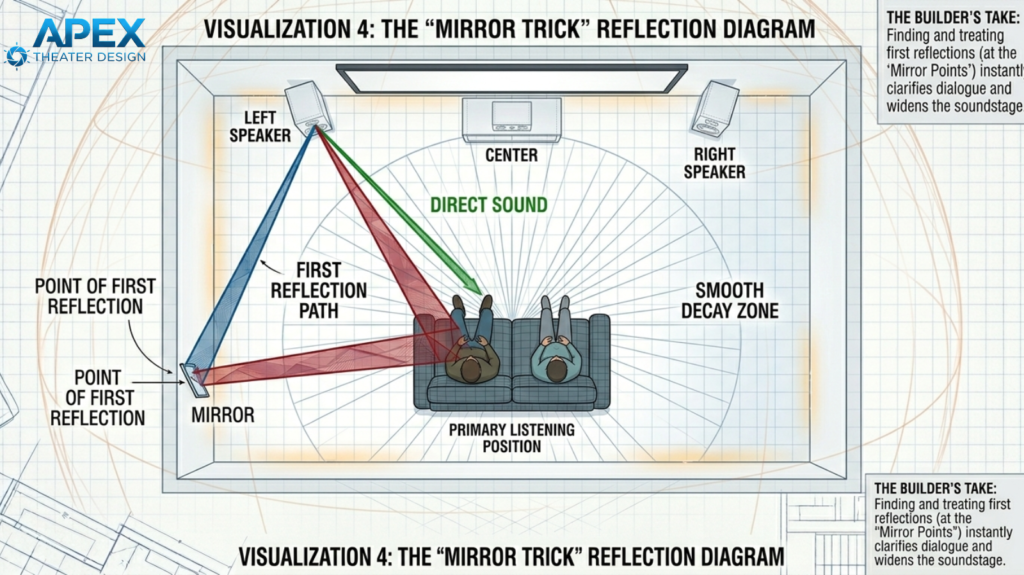
The Mirror Trick: Find Your First Reflection Points
You don’t need to cover your entire room in panels. You just need to hit the “first reflection points.” These are the specific spots where sound hits the wall on its way to your ears.
How to find them:
- Sit in your primary listening chair.
- Have a friend slide a handheld mirror along the side wall at your eye level.
- The moment you see the Left Speaker in the mirror, stop. Mark that spot with a piece of tape.
- Keep sliding until you see the Right Speaker. Mark that spot too.
- Repeat this process on the opposite wall.
The Fix: Place a 2-inch-thick acoustic absorption panel over those marked spots. By “catching” the sound at these four points, you stop the echo before it starts. You’ll notice an immediate difference: voices will sound like they are coming directly from the screen, and the “fuzziness” of the room will vanish.
Check out this image describing how the mirror trick works for finding reflection points:
Bass Traps: Taming the Corners
While high-frequency sounds (like glass breaking or whistling) are easy to stop with thin panels, bass is a completely different kind of animal.
A 20 Hz bass wave is roughly 56 feet long. These massive waves tend to “build up” in the corners of your room, creating a muddy, boomy sound that masks everything else.
- The Problem: If you don’t treat your corners, the bass waves will bounce back into the room and collide with the new waves coming out of your sub, canceling them out or doubling them in a messy way.
- The Fix: Use bass traps (thick 4-to-6-inch panels) in at least the two front corners of your room. These soak up” that excess low-end energy, allowing your subwoofer to sound tight, fast, and punchy rather than slow and bloated.
Pro Tip: Don’t Over-Dampen! A common beginner mistake is covering every inch of the wall in foam. This makes a room feel “dead” and “unnatural,” which can be uncomfortable to sit in. You want a mix of absorption (to kill echoes) and diffusion (to scatter sound). Start with the reflection points and the corners. In most cases, that’s all you need to achieve a professional-grade transformation.
Cable Management & Future-Proofing
Once your room is acoustically treated and the layout is set, you need to think about the “nervous system” of your theater: the wiring.
I have never, in my entire career, heard a client say, “I wish I had run fewer wires.” In fact, the biggest regret most DIY builders have is sealing up their drywall before they’ve truly future-proofed the room.
To truly future-proof your space, you need to stop focusing on the wires and start focusing on the path they take…
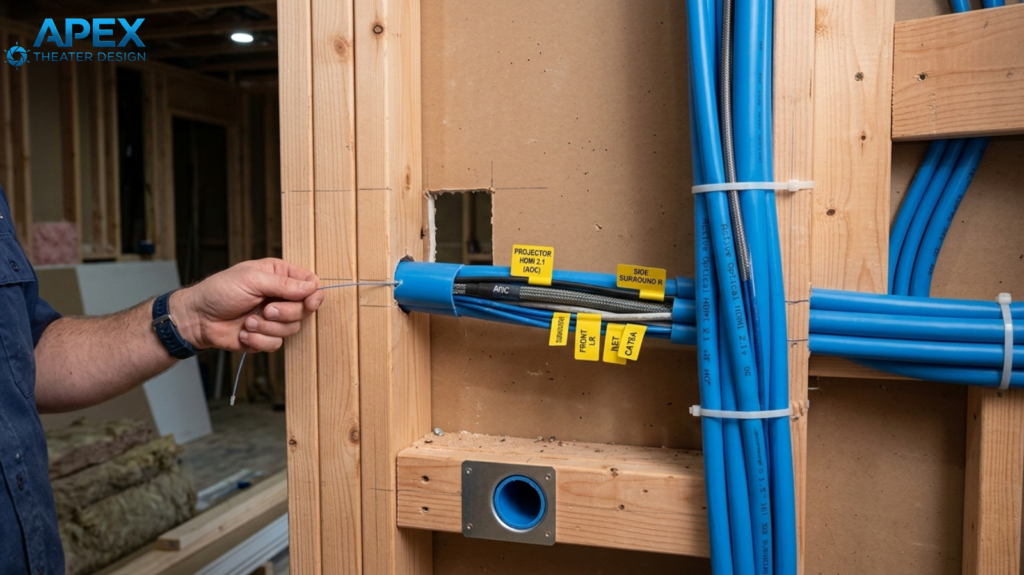
Conduit Is The Best Way To Future-Proof Your Walls
If your walls are open during construction, your first priority isn’t the cables themselves but the path they take. I tell everyone: Conduit is King.
By running 1.5-inch flexible PVC conduit (often called “Smurf tube”) from your equipment rack to the projector and the screen wall, you are essentially “futureproofing” your house.
Technology moves fast; the HDMI 2.1 cable that is state-of-the-art today will eventually be replaced.
With conduit already in place, pulling a new cable takes five minutes. Without it, you’ll have to rip out drywall and repaint it just to get a better picture.
Bridging the Distance: The 4K/8K Signal Barrier
As you pull those cables through your conduit, you need to be very careful about the length of the run.
Standard copper HDMI cables are fine for short distances, but once you go over 15 feet (this is common when running a line to a ceiling-mounted projector), copper starts to fail.
You’ll experience “sparkles” in the image, screen flickering, or a total loss of signal because copper simply can’t carry 48Gbps of data over long distances without signal degradation.
In such cases, the best fix is to use Active Optical HDMI (AOC)cables for any run over 15 feet. These cables use fiber optics to carry the signal via light, meaning they are immune to electromagnetic interference and can maintain full 4K/120Hz or 8K bandwidth over massive distances.
They are more expensive, but they are the only way to ensure your projector receives the high-quality signal your receiver is sending.
The “Spouse Approval Factor” (SAF) and Aesthetics
A home theater should be a place you want to spend time in, not a room that looks and feels like a high-voltage laboratory.
So, how do you achieve this? You simply need to focus on the Spouse Approval Factor (SAF).
Here’s how to do that:
Use In-Wall Speakers for a Cleaner Look
You don’t need massive towers taking up floor space to get world-class audio. High-end in-wall speakers from brands like KEF, Perlisten, or Wisdom can match the performance of traditional floor-standing models, if you choose the right ones.
My personal tip to you is that you look for speakers with an integrated back box (a built-in enclosure). This ensures the sound stays consistent and prevents audio from leaking into the rooms next door.
Hide Your Gear and the “Blinky” Lights
Once you have the speakers tucked away, the next step is to address the equipment itself. Nothing ruins a dramatic movie scene like a bright blue LED light peeping directly under your screen.
A cool fix is to move your receivers and amplifiers to a dedicated rack at the back of the room or hide them in a nearby closet.
Because you’re hiding the gear, you should keep in mind that standard remotes won’t work here, as the line of sight will be affected.
You’ll need to use an RF Remote (like URC or ProControl) or a mobile app. These don’t require “line-of-sight,” allowing you to control your hidden system through walls and cabinet doors with zero effort.
Pro Tip: Acoustically Transparent Screens. If you want a truly clean look in your home cinema room, use an Acoustically Transparent (AT) screen. This allows you to hide your massive center-channel speaker and subwoofers directly behind the screen. The sound passes through the fabric, making it feel like the voices are coming directly from the actors’ mouths, just like in a commercial cinema!
Next Steps: Turn Your Plan Into A Real Theater
BEFORE you spend a dime on gear, I’d suggest that you do a “Painter’s Tape Walkthrough.” This simple step prevents you from making expensive mistakes by letting you visualize the layout before anything is bolted down.
Here’s how to do it:
- Tape the Screen: Use blue tape to mark the screen size on your wall. Sit in your actual chair—does the height feel comfortable, or are you straining your neck?
- Tape the Speakers: Mark where your towers or in-walls will go. Check that they aren’t blocked by furniture or hidden behind a door when it’s open.
- Perform the “Subwoofer Crawl”: Once you have your sub, place it right in your listening chair and play a bass-heavy track. Walk (or crawl) around the room and listen; the spot where the bass sounds cleanest and punchiest is exactly where the subwoofer should be placed. (See the image below on subwoofer crawl):
Home theater is a hobby of inches. A slight speaker adjustment, a small shift in seating, or a few degrees of projector tilt are what separate a “pretty good” room from a “breathtaking” one.
FAQs About Home Theater Room Layout And Room Planning:
Here are the answers to the most common questions about optimizing your home theater room layout for peak performance:
What is the standard theater layout?
A standard layout follows a “shoebox” design with a screen at one end and tiered seating facing it. It typically utilizes a 5.1 or 7.1 surround sound configuration, where speakers are placed at specific ear-level angles (usually 90 to $110 degrees for surrounds) to create a cohesive circle of sound around the primary listening position.
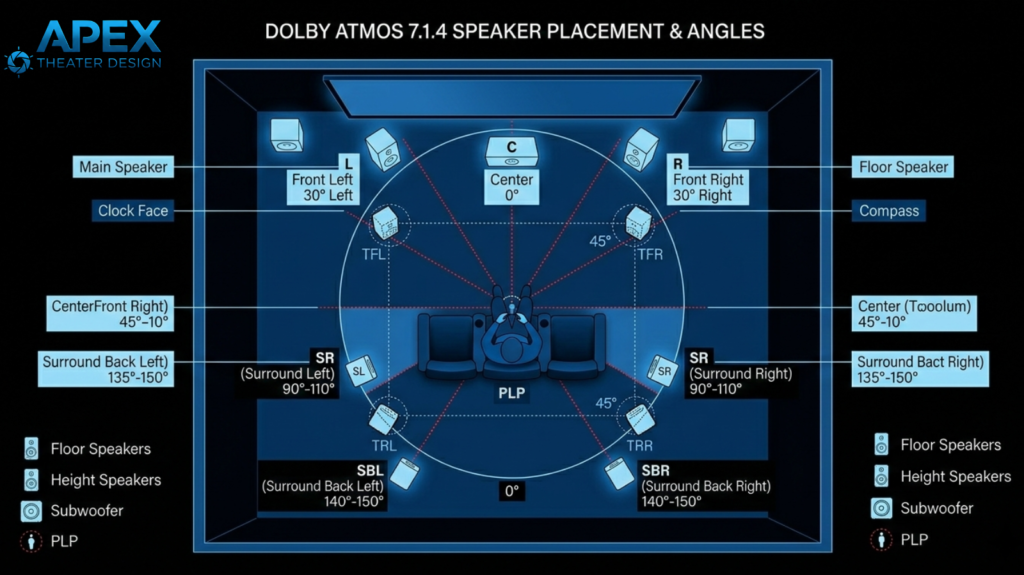
What is the ideal home theater layout?
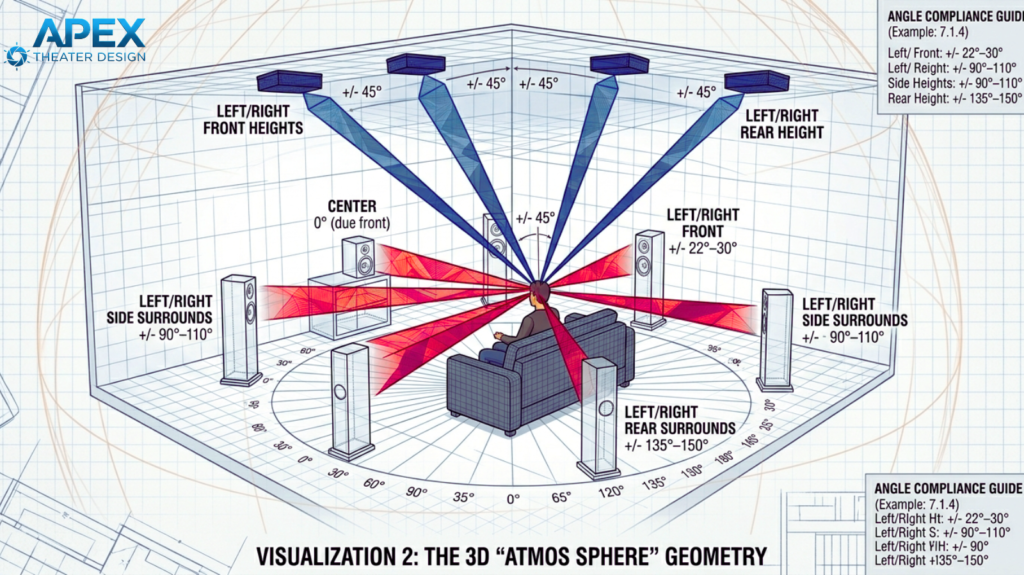
The ideal layout is a rectangular room with a 7.1.4 Dolby Atmos setup (check the image attached below). This includes seven floor-level speakers, one or more subwoofers, and four overhead speakers. Ideally, the seating is placed away from the back wall to prevent bass muddying, with the screen centered at a comfortable eye-level viewing height.
What is the golden rule for home theater?
The golden rule is the “Rule of Thirds” regarding seating and speaker placement. Never place your seating or speakers directly against a wall or exactly in the center of the room. Placing your ears at the 1/3 or 2/3 mark of the room’s length typically avoids the worst acoustic peaks and dips.
What is the golden ratio for a home theater room?
The most famous golden ratio is the “Bolt Area” or the 1.0 : 1.6: 2.33 ratio (Height x Width x Length). For a room with 8-foot ceilings, this translates to roughly 13 x 19 feet. These specific dimensions are designed to spread out “room modes,” preventing bass frequencies from becoming boomy or distorted.
What is a good size for a home theater room?
A good medium-sized room is roughly 15 feet wide by 20 feet long with 8-foot ceilings. This provides enough volume to accommodate two rows of seating and a 120-inch screen comfortably. Small rooms (10×12) can work for single-row setups, but they require much more aggressive acoustic treatment to sound clear. Check out our guide on how to turn a small basement into a home theater.
How to arrange a home theater?
Start by centering the screen on the shortest wall to maximize throw distance. Place your primary seat at a distance roughly 1.5 to 2 times the screen height. Arrange speakers in a circle around that seat, ensuring the center channel is directly behind or below the screen, and the subwoofers are placed for even bass.
What is the best flooring for a theater room?
Wall-to-wall carpeting with a thick, specialized pad is the gold standard for home theaters. Hard surfaces like tile or hardwood create harsh sound reflections that ruin dialogue clarity. Carpet absorbs these high-frequency “slaps” and helps keep the room quiet, ensuring the only thing you hear is the audio from your speakers.
Final Thoughts
To build a world-class home theater room, you don’t have to chase the highest price tag; it’s mainly about creating a space that disappears the moment you dim the lights. After years in this industry, my best advice is to first focus on the home theater room layout of your theater, which includes wiring, acoustics, and physical placement, before obsessing over the latest tech specs. If you get the foundation part right, your theater will provide you with years of magic.